Sublimation Fabric Printing: Techniques and Tips?
You're creating beautiful designs, but your printed fabrics are coming out faded, blurry, or scorched. This frustration leads to wasted materials and time, holding you back from producing the professional-quality products your clients expect. Let me share my hard-won techniques.
Successful sublimation fabric printing relies on three key pillars: using the right fabric (high-polyester content), perfecting your heat press settings (time, temperature, pressure), and adopting meticulous prep work to prevent common errors like ghosting, moisture spots, and color inaccuracies.
I've spent years perfecting my craft, from my early days on the factory floor to running my own successful business. I can tell you, the learning curve with fabric can be steep. I remember the pain of ruining an entire roll of expensive performance fabric because my pressure was uneven. These are the kinds of mistakes that can sink a small business. But every mistake taught me a valuable lesson. Now, I want to pass those lessons on to you, so you can skip the frustration and start producing flawless prints consistently.
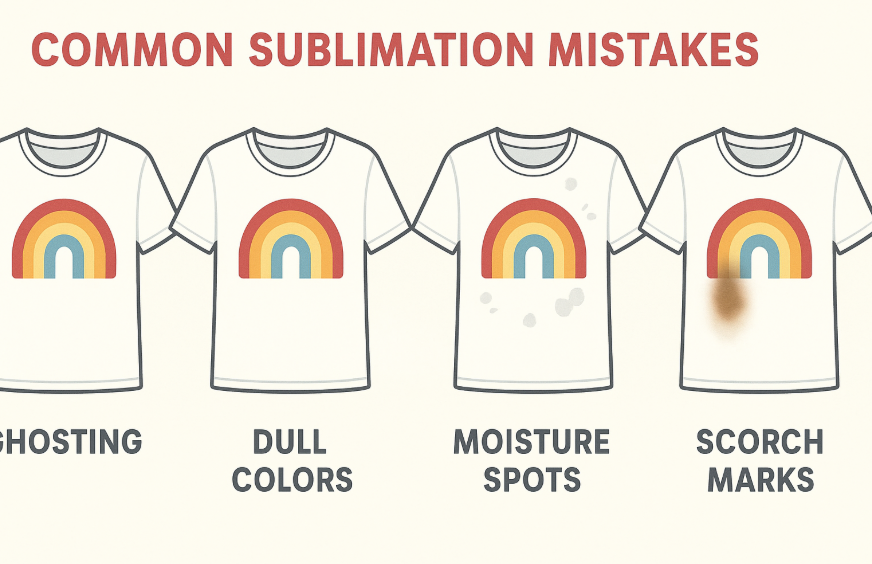
What are the common sublimation mistakes?
Your prints have issues: ghosting, odd color splotches, or scorch marks. These amateur mistakes make you look unprofessional and are costing you real money in wasted fabric. I'll show you how to spot and fix these common problems for good.
The most common sublimation mistakes include ghosting from the paper shifting, dull colors from using low-polyester blends, moisture spots from not pre-pressing, and scorch marks from incorrect heat settings. Each of these is easily preventable with the right technique and attention to detail.
Dive Deeper: From Amateur to Pro by Fixing Errors
When I mentor designers like Emma, we almost always start by diagnosing their "bad" prints. It's like being a detective. That little blue speck? That's lint. That yellowing around the edges? Too much heat. Understanding the cause is the first step to mastering the craft. I've ruined more shirts than I can count, but each one taught me something vital. Let's break down the most frequent culprits and how to defeat them. This is the checklist I use in my own shop every single day to ensure quality control.
| Common Mistake | What It Looks Like | The Cause | The Pro Solution |
|---|---|---|---|
| Ghosting / Blurring | A faint double image or blurry edges. | The sublimation paper shifted slightly when you opened or closed the press, or as you removed it. | Use heat-resistant tape to secure the paper to the fabric on at least two sides. Don't let the paper slide when you peel it off. For some items, opening the press slowly helps. |
| Dull / Faded Colors | The print lacks vibrancy and looks washed out, even before washing. | 1. Fabric has low polyester content. 2. Temperature is too low or press time is too short. 3. Low-quality ink or paper. | 1. Use 100% polyester for vibrant prints. 2. Calibrate your settings. Do a test print on a small swatch first. 3. Invest in reputable ink and paper brands. It makes a huge difference. |
| Blue Specks / Spots | Tiny, random blue or dark spots on the print. | A piece of lint or dust was on the fabric before pressing. The sublimation process dyes the lint, which then stains your shirt. | Always use a lint roller on your fabric right before you place the transfer paper, even if it looks clean. It's a non-negotiable step. |
| Scorch Marks / Yellowing | The white areas of the fabric have a yellow or brown tint. | The temperature is too high or the press time is too long for that specific fabric. A dirty top platen can also transfer residue. | Lower your temperature in 5-degree increments. Always use a protective Teflon or parchment paper sheet between the fabric and the heat platen. Clean your platen regularly. |
How do I get the best sublimation results?
Your prints are okay, but they lack that "wow" factor. You want a reputation for amazing quality, but your results are just average, not exceptional. Let me show you the small habits that deliver consistently stunning prints.
To get the best results, start with a high-resolution (300 DPI) design file. Use quality sublimation paper and ink. Meticulously pre-press your 100% polyester fabric to remove moisture and lint. Finally, use a calibrated heat press with even pressure and a protective sheet.
![A perfectly printed, vibrant sublimation t-shirt being shown off.]

Dive Deeper: The Pro's Workflow for Flawless Prints
Achieving consistently great results isn't about one secret trick; it's about building a professional workflow where excellence is the standard at every step. In my business, we don't just "press shirts." We follow a strict protocol that ensures the last tumbler of a 500-piece order looks just as perfect as the first. This is the difference between a hobbyist and a professional print shop. It's about controlling every variable you can. A designer like Emma can have the best design in the world, but if the production process isn't right, the final product will fail. Let's walk through the key pillars of that professional workflow.
- Pillar 1: Start with Digital Excellence
The final print can only be as good as your source file. I always tell my clients, "garbage in, garbage out." You absolutely must start with a high-resolution image, ideally 300 DPI (dots per inch) at the final print size. A low-resolution image pulled from a website will look pixelated and blurry when printed. Also, be sure to design in an RGB color profile, as sublimation printers translate RGB colors most accurately. Finally, and most importantly, mirror your image in the software before you print. Forgetting this simple step is a rookie mistake I still see all the time, especially with designs that include text. - Pillar 2: The Pre-Press Ritual
This is the step most beginners skip, and it's the cause of so many problems. Fabric, especially polyester, absorbs ambient moisture from the air. If you press a damp shirt, that moisture turns to steam and can create blotchy, uneven colors. The solution is simple: pre-press your fabric for 5-10 seconds. This drives out any invisible moisture and also smooths out any wrinkles. Right after the pre-press, use a lint roller one last time to catch any fibers. This two-part ritual takes less than 20 seconds and prevents the two most common print-ruining issues: moisture blotches and lint spots. It is the single most effective habit you can adopt. - Pillar 3: The Art of Pressure
Correct temperature and time are easy to set, but pressure is more of an art. "Medium pressure" is subjective. Too little pressure causes faded, inconsistent prints. Too much can cause the ink to blow out and create blurry edges. To check for even pressure, I use the "dollar bill test." Place dollar bills around the edges of your platen and close it. If you can easily pull a bill out, the pressure is too low in that area. Your goal is for there to be firm resistance on all bills. Ensuring your press has even pressure across the entire surface is critical for large prints and consistent results job after job.
Can I sublimate on 50% cotton and 50% polyester?
You've found a soft-feel shirt that clients love, but it's a 50/50 blend. You're afraid to use it, thinking the design will wash out and look terrible. This fear limits your product offerings. I'll explain how to use this blend to your advantage.
Yes, you can sublimate on a 50/50 blend, but only 50% of the ink will bond permanently. This creates a faded, "vintage" or "heathered" effect. The look is intentional and popular for fashion apparel, but will not be as vibrant as 100% polyester.
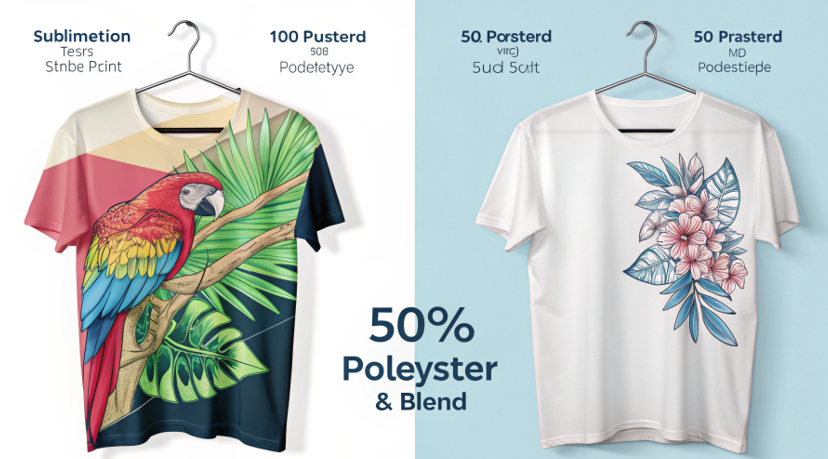
Dive Deeper: Embracing the Vintage Aesthetic
This is a perfect example of knowing the rules so you can break them creatively. While 100% polyester gives you that pop of vibrant color, it doesn't always have the soft, natural feel that some clients want. Using a 50/50 blend is a strategic choice. I work with several boutique brands that exclusively use 50/50 blends because the muted, worn-in look is central to their brand identity. The key is managing expectations. You have to sell it as a "vintage print," not as a defect. The ink that bonds with the polyester fibers is permanent; it won't fade any further or peel. The ink that was on the cotton fibers simply washes away in the first laundry cycle, revealing the final look.
Here's how to think about it:
- The Process: You press your design just like you would on 100% polyester. The heat turns the ink to gas.
- The Result on Polyester: The gaseous ink infuses into the 50% polyester fibers, creating a permanent, vibrant bond within those specific fibers.
- The Result on Cotton: The gaseous ink has nothing to bond with on the 50% cotton fibers. It just sits on the surface.
- The First Wash: All the unbonded ink on the cotton washes out.
- The Final Look: You're left with a design that is only visible on the polyester threads, creating a cool, heathered effect where the white cotton threads show through. It's a feature, not a bug, as long as you and your client know what to expect.
Do you let sublimation cool before peeling?
The press timer just went off. You're anxious to see the result, but you hesitate. Do you peel the paper off now while it's hot, or do you wait? Doing it wrong can cause "ghosting" and ruin a perfect print.
For most fabrics and hard goods like ceramics, it is best to peel the sublimation paper off immediately while the item is still hot. This prevents the ink from re-gassing and causing a blurry "ghost" image as it cools and the paper potentially shifts.
Dive Deeper: The Hot Peel vs. Cold Peel Debate
This is one of the most debated topics in sublimation forums, but in a professional production environment, the answer is clear for most substrates. For my business, which handles textiles, tumblers, and mugs, we hot peel 99% of the time. The science is straightforward: as long as the item is hot, the ink is still in a slightly active, gaseous state. If you allow the item to cool with the paper still on it, any tiny shift of that paper can cause the ink to re-settle a millimeter away from where it first bonded, creating a blurry shadow or "ghosting." Peeling it off hot and in one swift motion removes the transfer paper from the equation before this can happen.
There are very few exceptions. Some specific, specialty substrates may call for a cold peel in their instructions. These are rare.
Here is my recommended process for a perfect peel:
- Safety First: Your item is going to be extremely hot (up to 400°F / 200°C). Always wear heat-resistant gloves.
- Prepare Your Space: Have a heat-resistant mat or cooling rack ready next to your press. You want a smooth, efficient transfer from the press to the cooling area.
- Open with Care: Open the heat press smoothly but deliberately. Avoid letting the top platen "jump" up, which can cause the paper to shift.
- Transfer and Peel: Move the item to your cooling area. Using one hand to hold the item steady, grab a corner of the sublimation paper and peel it back in one fluid, confident motion. Don't stop and start. Don't hesitate. A smooth, quick peel is the goal.
- Let it Cool: Place the finished item on the cooling rack and let it come to room temperature on its own.
By making the hot peel a standard part of your workflow, you eliminate one more variable and prevent the frustrating ghosting that can ruin an otherwise perfect print.
Conclusion
Mastering sublimation requires using the right materials and techniques. Avoid common mistakes, follow a pro workflow, understand your fabrics, and always peel hot for clean, vibrant results every single time.

Hi there! I'm Lucy, the guardian angel of two good children. During the day, I am a professional in the heat transfer printing industry, from factory workshops to running my own business. Here I share what I have learned - let's grow together!