Sublimation Mug Temperature and Time Chart for Perfect Prints?

Tired of your sublimated mugs coming out faded, blurry, or even scorched? You're wasting expensive blanks, ink, and time, only to end up with amateur-looking products.
This frustration kills your confidence and profits. Every failed mug is money down the drain, and you can't seem to find a reliable guide to get the consistent, vibrant results you need.
A sublimation mug temperature and time chart is your best starting point. For most ceramic mugs in a standard press, begin with a temperature of 380-400°F (193-204°C) and a time of 180-210 seconds. Adjusting from here based on your specific equipment is key.
In my early days, I must have thrown away a whole case of mugs trying to get my settings right. I’d follow one online tutorial, and the print was faded. I’d try another, and the black ink looked brown. It was incredibly frustrating. I realized that sublimation is as much an art as it is a science. While there isn't one single magic number for every setup, there are foundational guidelines that will get you 95% of the way there. Let’s create that reliable starting point for you, so you can stop guessing and start printing perfectly.
What's the exact temperature and time to sublimate a mug?
You search online for mug press settings and find ten different answers. This conflicting advice leaves you confused and unsure where to even begin, leading to inconsistent and disappointing results.
This constant second-guessing wastes your time and materials. You press a mug, it fails, and you're back to square one, not knowing which variable to change for the next attempt.
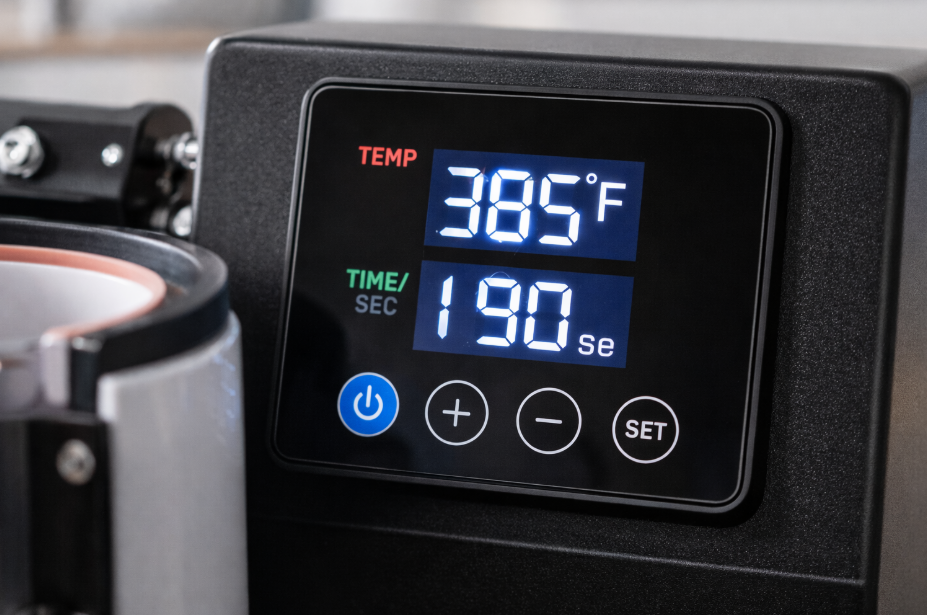
For a standard 11 oz ceramic mug in a mug press, a reliable starting point is 385°F (196°C) for 190 seconds with medium pressure. This range allows the ink to fully convert to a gas and bond with the polymer coating without burning the design.
 )
)
Dive Deeper: Why One Size Doesn't Fit All
I call 385°F for 190 seconds my "golden starting point" because it works for most standard setups. However, every heat press, mug, and even environment is slightly different. Think of this as a recipe: you might need to adjust the cooking time based on your specific oven. Designers like Emma need consistency, so understanding why you might need to adjust is crucial. Several factors can influence your ideal settings.
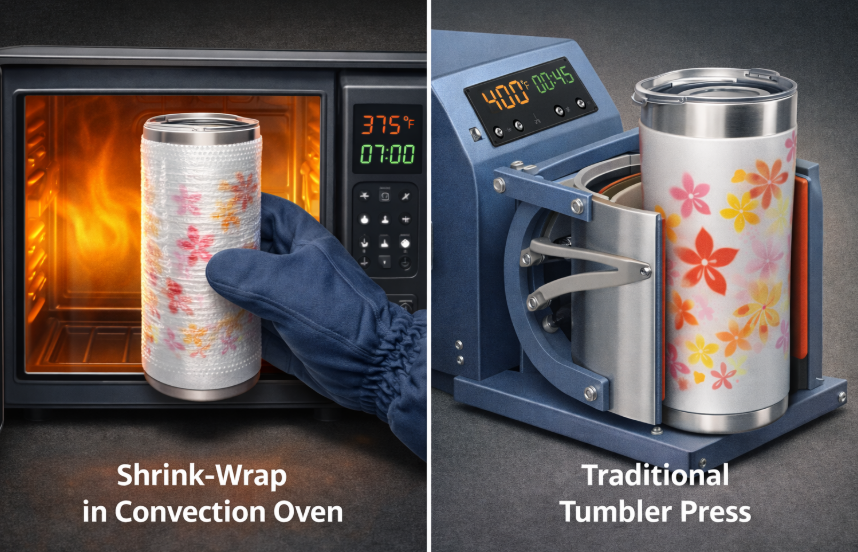
- Heat Press vs. Convection Oven: A mug press applies direct, concentrated heat, so times are shorter. A convection oven uses ambient air, requiring longer times (often 12-15 minutes) and special silicone wraps to apply pressure.
- Mug Material & Size: A ceramic mug heats differently than a stainless steel tumbler. A thicker 15 oz mug has more mass and may require an extra 15-30 seconds compared to a standard 11 oz mug to heat through completely.
Here is a simple chart I give my clients to use as a starting point. Always press one test mug first!
| Item Type | Equipment | Temperature | Time | Pressure |
|---|---|---|---|---|
| 11 oz Ceramic Mug | Mug Press | 385°F / 196°C | 180-200 seconds | Medium |
| 15 oz Ceramic Mug | Mug Press | 385°F / 196°C | 200-220 seconds | Medium |
| 11-15 oz Ceramic Mug | Convection Oven | 400°F / 204°C | 12-15 minutes | Firm (Silicone Wrap) |
What are the most common sublimation mistakes to avoid?
Your prints look pretty good, but you keep seeing faint double images, blurry spots, or faded sections. These small imperfections are ruining your products and making them look unprofessional.
This is so frustrating because you're close to perfect, but something is clearly wrong. You can't confidently sell your products, and you're not sure what you're doing wrong to cause these flaws.
The most common sublimation mistakes are inconsistent pressure, moisture, using the wrong settings, and allowing the paper to shift. These lead to ghosting, blurry prints, color inaccuracies, and faded spots. Fortunately, these are all easily fixable with the right technique and attention to detail.

Dive Deeper: Fixing the Flaws Before They Happen
Over the years, I’ve seen every mistake in the book. The good news is that 99% of them fall into a few categories. Let's break them down so you can avoid them entirely.
1. Moisture: The Silent Print Killer
This is the number one culprit for blurry or splotchy areas. Even humidity in the air can infuse moisture into your sublimation paper. When heated, this moisture turns to steam and blows the ink away from the surface.
- The Fix: Always store your sublimation paper in a sealed bag or a dry box. For extra insurance, you can pre-press your blank mug for 5-10 seconds to evaporate any surface moisture before taping your design on.
2. Uneven or Incorrect Pressure
If your pressure is too light, the paper won't make full contact, leaving faded or white spots. If it's too heavy, the ink can bleed out, causing blurry edges.
- The Fix: Your pressure should be firm enough that the mug is held securely, but not so tight that you have to slam the press shut. When you close it, you should feel solid resistance.
3. Ghosting from Shifting Paper
"Ghosting" is that faint double image you see, and it happens when the paper moves even a millimeter while it's hot.
- The Fix: Use high-temperature heat-resistant tape. Don't be shy with it! Tape the seams and secure the top and bottom edges of the paper tightly to the mug so it's impossible for it to wiggle when you open or close the press.
What's the right temperature and time for sublimation printing in general?
You've mastered mugs, but now you want to sublimate a t-shirt. If you use your mug settings, you'll scorch the fabric and ruin the shirt instantly.
This fear of damaging new types of products can stop you from expanding your business. You stick to what you know, missing out on profitable markets for apparel, coasters, and more.
There is no single temperature for all sublimation. Settings depend entirely on the item's material. Hard goods like ceramics and metal need high heat (around 400°F / 204°C) to absorb the ink, while soft fabrics need lower heat (380-385°F / 193-196°C) for a shorter time to prevent burning.
Dive Deeper: Matching the Settings to the Substrate
The core principle of sublimation is heating a polymer (the coating on a mug) or polyester (the fabric in a shirt) until it opens up to accept the ink gas. Different materials reach this state at different rates. For a creative designer like Emma, knowing these basics is essential for expanding her product line.
- Hard & Dense Substrates: Items like ceramic tiles, metal sheets, and mugs are thick. They need higher temperatures and longer times for the heat to fully penetrate the object and activate the entire coated area.
- Soft & Thin Substrates: Polyester fabric, mousepads, and felt air fresheners heat up almost instantly. They require shorter press times. Leaving them in too long will cause the polyester fibers to melt and the colors to burn, often turning yellows into a mustardy brown.
Here's a general guide for popular items beyond drinkware. Remember, always check the manufacturer’s recommendations for your specific blanks!
| Product | Temperature Range | Time Range | Key Consideration |
|---|---|---|---|
| 100% Polyester T-Shirt | 385°F / 196°C | 45-60 seconds | Use butcher paper inside the shirt to prevent bleed-through. |
| Mousepad | 380°F / 193°C | 50-60 seconds | Light to medium pressure is usually sufficient. |
| Ceramic Tile | 400°F / 204°C | 240-300 seconds | Press face down for the most even heat distribution. |
| Aluminum Sheet | 400°F / 204°C | 60-75 seconds | Peel transfer paper immediately while hot to avoid haze. |
How long does it take to sublimate a 15 oz mug?
You just bought a case of 15 oz mugs, but your usual 11 oz settings are leaving faded patches on them. Now you're frustrated and wasting more expensive blanks.
This problem costs you money and time. Each failed 15 oz attempt is a bigger loss than a standard mug, and you're stuck experimenting instead of fulfilling orders.
A 15 oz mug typically requires more time to sublimate than an 11 oz mug, usually around 20-30 seconds longer. This extra time is needed for the heat to fully penetrate the mug's thicker walls and larger surface area, ensuring a complete and vibrant ink transfer.

Dive Deeper: It’s All About Thermal Mass
The reason a 15 oz mug needs more time isn't complicated: it's simply a bigger, thicker object. This concept is called thermal mass. It has more ceramic material that needs to be heated up to the target temperature of 385-400°F. Your heat press is working harder to get the entire surface hot enough for sublimation to occur.
- The Problem with Using 11 oz Settings: If you use the shorter time for an 11 oz mug (e.g., 190 seconds), the press will open before the thickest parts of the 15 oz mug have reached the full temperature. The ink in those cooler spots won't turn to gas properly, resulting in faded, underdeveloped prints, especially near the top, bottom, and handle.
- Making the Adjustment: The fix is simple. Keep your temperature the same, but increase your time. My recommendation is to add 25 seconds to your proven 11 oz mug time as a starting point. For example, if your 11 oz mugs print perfectly at 190 seconds, set your timer to 215 seconds for the 15 oz mugs. This gives the heat the extra time it needs to soak in and do its job, resulting in a perfectly saturated, even print from top to bottom.
Conclusion
Mastering sublimation requires controlling temperature and time. Start with our recommended settings, understand common mistakes, and always adjust for your specific product and equipment to achieve perfect, vibrant prints every time.

Hi there! I'm Lucy, the guardian angel of two good children. During the day, I am a professional in the heat transfer printing industry, from factory workshops to running my own business. Here I share what I have learned - let's grow together!